HP Printer Error Codes
HP Printers - 'Ink System Failure' or '0x ...' Error Code Displays
This document is for HP Deskjet, Officejet, and Photosmart printers that use 564, 364, 178, 862, or 920 ink cartridges, and have a removable printhead.
Figure : Example of 564, 364, 178, 862, and 920 ink cartridges.

An Ink System Failure error message or an error message with numbers and letters (an alphanumeric code), such as 0xc18a0001, displays on the printer control panel or computer.
The Ink System Failure error message might display with an alphanumeric code, or the alphanumeric code might display by itself. Some errors begin with ‘0x…’, while others begin with a ‘B’ or ‘C,’ and they are usually preceded by the word Error.
The exact text of the error messages varies by printer.
Examples of an alphanumeric error codes (where x is any letter or number) are:
-
0xC19A0003
-
0xc19a0013
-
0xc19a0043
-
c05d0082
For a complete list of error codes, go to the Examples of additional error codes section at the end of this document.
Step 1: Check your cartridges.
Check to see if you are using original HP cartridges or compatible/remanufactured as the steps in this document are only intended to resolve issues with original HP cartridges. For help on solving issues with compatible/remanufactured cartridges go to our Help & FAQ's section.
Step 2: Reset the printer
In some cases, a printer reset can clear the error message.
-
Turn the printer on, if it is not already on.
-
Wait until the printer is idle and silent before you continue.
-
With the printer turned on, disconnect the power cord from the rear of the printer.
-
Unplug the power cord from the wall outlet.
-
Wait at least 60 seconds.
-
Plug the power cord back into the wall outlet.
NOTE:
HP recommends connecting the printer power cord directly to the wall outlet. -
Reconnect the power cord to the rear of the printer.
-
Turn on the printer, if it does not automatically turn on.The printer might go through a warm-up period. The printer lights might flash, and the carriage might move.
-
Wait until the warm-up period finishes and your printer is idle and silent before you proceed.
If the issue persists, continue to the next step.
Step 3: Check estimated ink levels.
The error might be caused by a low or empty ink cartridge. If an Ink Alert message displayed before the error occurred, replacing the ink cartridge(s) might resolve the issue.
Check your printer control panel for the Estimated Ink Levels feature. Control panel options vary by printer model. If you are unable to display the ink levels on the printer control panel, select your computer operating system below.
NOTE:
Ink level warnings and indicators provide estimates for planning purposes only. When an indicator shows low-ink levels, consider having a replacement ink cartridge available to avoid possible printing delays. You do not need to replace ink cartridges until print quality becomes unacceptable.
Step 4: Clean the ink cartridge vents and contacts
Ink buildup or debris on the ink cartridge contacts and vents might cause an ink cartridge error.
-
Gather the following materials:
-
A pin to clean any clogged vents
-
A clean, lint-free cloth
-
A clean, dry cotton swab
-
Distilled or bottled water
CAUTION:
Do not use tap water because it might contain contaminants that can damage the printhead.
-
-
Turn on the printer.
-
Open the ink cartridge access door.
-
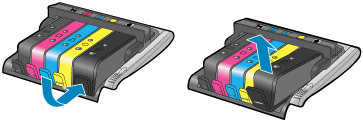
To remove the ink cartridge, press the tab on the front of the ink cartridge to release it, and then remove it.Figure : Example of removing an ink cartridge from the printhead
-
Place the ink cartridges on a clean piece of paper with the ink opening pointing up.
CAUTION:
Do not leave the ink cartridges outside the printer longer than 30 minutes. Doing so can result in damage to both the printer and the ink cartridges. -
If an orange tab is attached to any ink cartridge, remove it.Figure : Example of the orange tab

-
Examine the vent area located on top of the ink cartridge, next to the HP logo.Figure : Example of the vent area

-
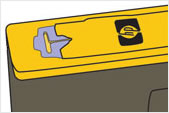
If any of the ink cartridges have clogged vents, use a pin to clean the vents.Figure : Example of a clogged vent
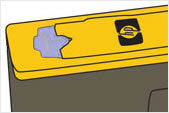 Figure : Example of a clean vent
-
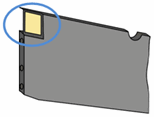
Use a fresh, lightly dampened, lint-free cloth to wipe any accumulated ink and debris on the copper-colored contact on the ink cartridge.Figure : Example of the copper-colored contact on the ink cartridge
-
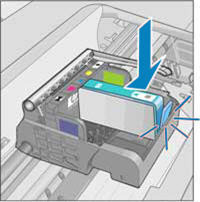
Carefully reinsert one of the ink cartridges into its slot, and then push the ink cartridge down and forward until it snaps into place.Make sure each colored dot on the ink cartridge label matches the colored dot on the carriage.Figure : Reinserting the ink cartridge into the correct slot
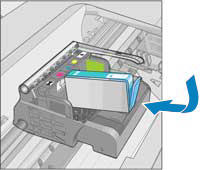 Figure : Example of snapping the ink cartridge into place
-
Run your finger along the top of the ink cartridges to make sure none of them protrude.If any ink cartridges protrude, press down firmly until each ink cartridge snaps into place.
-
Close the ink cartridge access door.
-
Check the printer control panel display for the error message.
If the issue persists, continue to the next step.
Step 5: Clean the printhead with an automated tool
The printhead could be clogged, and you might need to clean the printhead several times to restore print quality. Use an automated tool from the printer control panel to clean the printhead.
Step 6: Manually clean the printhead
If the printhead cleaning tool did not resolve the problem, the printhead might be installed incorrectly, or there might be ink or debris on the printhead electrical contacts.
CAUTION:
Clean the printhead contacts only after running the printhead cleaning utility from your computer. Printhead contacts contain sensitive electronic components that can be damaged easily.
-
Gather the following materials:
-
A clean, lint-free cloth
-
A clean, dry cotton swab
-
Distilled or bottled water
CAUTION:
Do not use tap water because it might contain contaminants that can damage the printhead.
-
-
Open the ink cartridge access door.
-
To remove the ink cartridge, press the tab on the front of the ink cartridge to release it, and then remove it.Figure : Example of removing an ink cartridge from the printhead
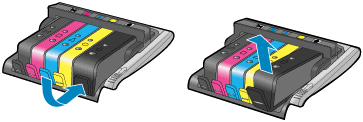
-
Place the ink cartridges on a clean piece of paper with the ink opening pointing up.
CAUTION:
Do not leave the ink cartridges outside the printer longer than 30 minutes. Doing so can result in damage to both the printer and the ink cartridges. -
Lift the latch handle on the ink carriage until it stops.Figure : Lifting the ink carriage latch handle
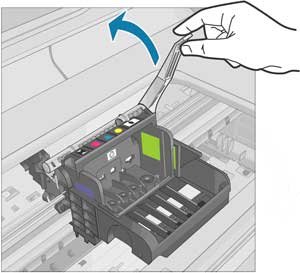
-
Lift up to remove the printhead from the ink carriage.Figure : Removing the printhead
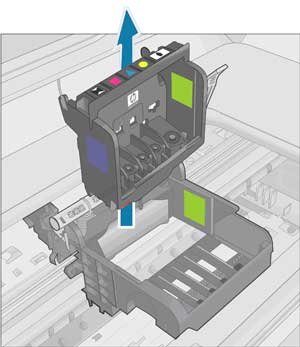
-
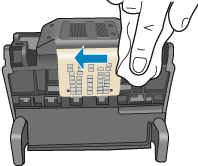
Review the three areas of the printhead that need to be cleaned.Figure : Example of the three areas to clean on the printhead
CAUTION:
Do not touch the nozzles or the electrical contacts with your fingers. Touch the electrical contact areas only with the cleaning materials. -
Use a fresh, lightly dampened, lint-free cloth to wipe the electrical contact area from the bottom to the top until no new ink shows on the cloth.Use as many fresh, lightly dampened, lint-free cloths as necessary.Figure : Cleaning the electrical contacts
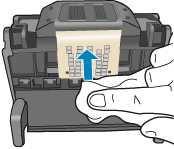
-
Use a fresh, lightly dampened, lint-free cloth to wipe any accumulated ink and debris from the edge between the nozzles and the contacts.Figure : Cleaning the edge of the printhead
-
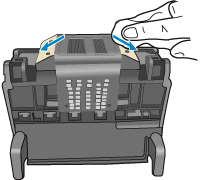
Use a fresh, lightly dampened, lint-free cloth to wipe the plastic ramps on both sides, away from the nozzles.Figure : Cleaning the printhead ramps
-
Wipe the previously cleaned areas dry with a dry, lint-free cloth.
-
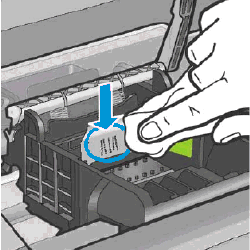
Use a fresh, lightly dampened, lint-free cloth to wipe the electrical contact area inside the printer from bottom to the top until no new ink shows on the cloth.Use as many fresh, lightly dampened, lint-free cloths as necessary.Figure : Cleaning the electrical contacts inside the printer
-
Wipe the electrical contact area dry with a dry, lint-free cloth.
-
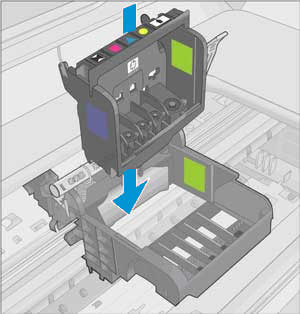
Make sure the ink carriage latch handle is up, then reinstall the printhead.Figure : Reinstalling the printhead
-
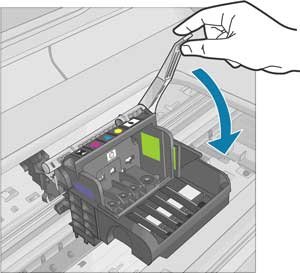
Carefully lower the ink carriage latch handle.Figure : Lowering the ink carriage latch handle
-
Reinsert the ink cartridge into the matching letter and colored dot slot, then push the ink cartridge down and forward until it snaps into place.Figure : Example of sliding the ink cartridge into the correct slot
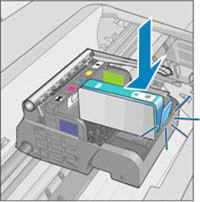
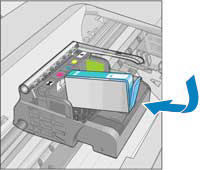 Figure : Example of snapping the ink cartridge into place
-
Run your finger along the top of the ink cartridges to make sure none of them protrude.If any ink cartridges protrude, then press down firmly until each ink cartridge snaps into place.
-
Close the ink cartridge access door.
-
Check the printer control panel display for the error message.
If the issue persists, continue to the next step.
Step 7: Replace the printhead
Install a new printhead assembly when the existing printhead assembly is damaged or is incompatible with the printer. Replacement printhead assemblies are only available from HP Customer Support or authorized service providers.
CAUTION:
Wait until you have a new printhead assembly available before removing the ink cartridges. Do not leave the ink cartridges outside the printer longer than 30 minutes. Doing so can result in damage to both the printer and the ink cartridges.
If you have a defective cartridge or printhead, it might be under warranty. To check the warranty on your ink or toner supplies, contact us and we'll help you out.
This information applies to all countries/regions, except Asia Pacific and United States.
If HP replaces your printhead assembly under warranty, you will receive a new printhead assembly, cleaning materials, and a full set of new cartridges.
If your printhead assembly is no longer under warranty, you will have to purchase a new one.
If the issue persists after replacing the printhead, continue to the next step.
Step 8: Service the printer
If the previous steps did not resolve the issue, contact HP to service the printer.
NOTE:
Keep a print sample that shows the problem. If the ink cartridges, printhead, or printer is replaced under warranty, the support agent will request the print sample. If the printer is returned to HP, the print sample must be returned with the printer. Place the sample in the output tray when you package your printer for shipping.
See the table below for examples of additional error codes that might display on your printer control panel:
|
0xC19A0001
|
0xC19A0024
|
0xc19A0042
|
0xC19AC100
|
0xC19AC2b5
|
|
0xC19A0002
|
0xC19A0025
|
0xC19AC001
|
0xC19AC129
|
0xC19AC2d6
|
|
0xC19A0003
|
0xC19A0026
|
0xC19AC002
|
0xC19AC14a
|
0xC19AC2f7
|
|
0xC19A0006
|
0xC19A0027
|
0xC19AC004
|
0xC19AC16b
|
0xC19AC318
|
|
0xC19A0008
|
0xC19A0028
|
0xC19AC008
|
0xC19AC18c
|
0xC19AC339
|
|
0xC19A0009
|
0xC19A0030
|
0xC19AC010
|
0xC19AC1ad
|
0xC19AC35a
|
|
0xC19A0013
|
0xC19A0033
|
0xC19AC020
|
0xC19AC1ce
|
0xC19AC37b
|
|
0xC19A0014
|
0xC19A0034
|
0xC19AC040
|
0xC19AC1ef
|
0xC19AC39c
|
|
0xC19A0015
|
0xC19A0035
|
0xC19AC063
|
0xC19AC200
|
0xC19AC3bd
|
|
0xC19A0020
|
0xC19A0036
|
0xC19AC080,
|
0xC19AC231
|
0xC19AC3de
|
|
0xC19A0021
|
0xC19A0037
|
0xC19AC0a5
|
0xC19AC252
|
0xC19AC3ff
|
|
0xC19A0022
|
0xc19A0040
|
0xC19AC0c6
|
0xC19AC273
|
0xC19AC400
|
|
0xC19A0023
|
0xc19A0041
|
0xC19AC0e7
|
0xC19AC294
|
All trademarks, photos and logos included on this page are the property of their respected owners.

